
Documentation for the Login with XING plugin
This page is an implementation guide and technical documentation for the Login with XING plugin.
The Login with XING plugin gives developers an easy way to authenticate visitors on their website and makes life easy for end-users by allowing them to use their existing XING account for identification while keeping their personal information safe.
Get started
Getting started with the plugin is easy.
- Create a new plugin with the generator. You will need a developer account for this.
- Add the generated code snippet in your webpage. Make sure the site is hosted under the domain you provided.
Congrats! Visitors to your site can now securely log in with their XING account. For ideas what to do next, see section User data.
Note:
- The plugin has to run in a secure browser environment to function properly, meaning your website must be served securely under https.
- The plugin will always work in developer environments under localhost or localhost.local.
How it works
The plugin is a small JavaScript library which you can place on your site and which allows a user to log in with their XING credentials. While doing so, users grant access to a set of fields from their XING profile.
Here is a visualization of what using the plugin looks like.
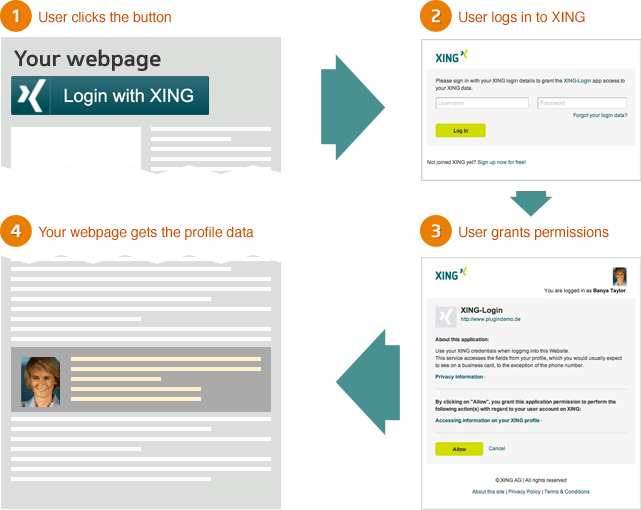
After clicking the plugin button, users sign in through a login form, which is opened inside a popup window. New users will then have to grant permissions to the plugin to access a part of their XING profile. After this, the user information is available to your site.
Note: The plugin button will be hidden after a user has logged in and the callback function has been triggered.
Hello world example
Below is a simple example of a site where a user can log in through the Login with XING button. The user’s name is printed on the page to signal a successful login by the onXingAuthLogin function.
<!DOCTYPE html>
<html>
<head>
  <title>Login with XING plugin Example</title>
  <meta charset="UTF-8">
  <script>
    // This function is called by the plugin after
    // the login flow is completed.
    function onXingAuthLogin(response) {
      var output;

      console.log(response);

      if (response.user) {
        output = 'Successful login for ' + response.user.display_name;
      } else if (response.error) {
        output = 'Error: ' + response.error;
      }

      document.getElementById('output').innerHTML = output;
    }
  </script>
</head>
<body>

  <!-- Place the plugin script -->
  <script type="xing/login">
    {
      "consumer_key": "[YOUR_CONSUMER_KEY]"
    }
  </script>

  <p id="output">No user logged in.</p>

  <!-- Include the plugin library -->
  <script>(function(d) {
    var js, id='lwx';
    if (d.getElementById(id)) return;
    js = d.createElement('script'); js.id = id; js.src = "https://www.xing-share.com/plugins/login_plugin.js";
    d.getElementsByTagName('head')[0].appendChild(js)
  }(document));</script>

</body>
</html>
Plugin configuration
To generate a plugin, please provide the following information:
| Field | Description |
|---|---|
| Domain required | The domain where you want to use the plugin. |
| Privacy policy URL optional | The URL of the website that provides your company's privacy policy which will appear in the authentication dialogue for the end user. If not specified, the privacy policy link will take the user to the domain for which the plugin was created. |
If you want to change the privacy policy URL for an existing plugin, open the Login with XING plugin generator, specify the domain as before, then enter the new URL for your privacy policy and accept the Terms and Conditions. After clicking on "Generate Code", this new information will be saved. You can confirm the change via the Plugins Dashboard.
When you create a plugin in the generator, this is what the code looks like:
<script type="xing/login">
  {
    "consumer_key":"[YOUR_CONSUMER_KEY]"
  }
</script>
<script>(function(d) {
  var js, id='lwx';
  if (d.getElementById(id)) return;
  js = d.createElement('script'); js.id = id; js.src = "https://www.xing-share.com/plugins/login_plugin.js";
  d.getElementsByTagName('head')[0].appendChild(js)
}(document));</script>
Parameters
| Name | Default | Description |
|---|---|---|
| consumer_key required | Unique identifier for your plugin tuned to work only on the domain you specified (though localhost and localhost.local will work for any consumer). The consumer key is also used with the logout function. | |
| onAuthLogin optional |
onXingAuthLogin
|
The name of your JavaScript function that will be called by the plugin when users successfully log in. User data is passed to the function as parameters and you specify the steps to be performed with it. See User data and Hello world example for more details. |
| language optional |
en
|
en English
de German
|
| size optional |
medium
|
small, medium, large, xlarge
|
| color optional |
green
|
green white text on dark green design
grey black text on light grey design
|
Make sure that you add the login_plugin.js library on your page. It doesn’t need to be right after the plugin setup but can be placed together with the rest of the scripts on your page.
Note: You can only add one Login with XING plugin per page, meaning that any additional ones will be ignored.
User data
When a user logs in successfully, user data is passed to the callback function, either the default onXingAuthLogin or one specified in the plugin configuration.
See below how the available user information is structured.
{
  "user": {
     "id": "...",
     "first_name": "...",
     "last_name": "...",
     "display_name": "...",
     "active_email": "...",
     "permalink": "...",
     "business_address": {
        "street": "...",
        "city": "...",
        "province": "...",
        "country": "..."
     },
     "photo_urls": {
        "maxi_thumb": "..."
     },
     "professional_experience": {
        "primary_company": {
           "name": "...",
           "title": "...",
           "industry": "..."
        }
     }
  },
  "error": null
}
Logout
xing.logout(callback, consumer_key);
If you want to log users out of your system, you should also log them out of the XING Login Plugin. Otherwise returning users will be logged in automatically and this may leave them confused if they didn’t expect to see XING data after logging out from your site.
To log users out of the XING Login Plugin you can use the logout function provided by the plugin library in the xing namespace.
Parameters
| Name | Default |
|---|---|
| callback optional | Your custom JavaScript function that is triggered when a user is logged out. |
By default, the user session will remain valid for 24 hours if the user closes the page without logging out. This means the next time the user opens your page, they will be logged in automatically if the session is still valid.
By calling the logout function, the XING Login Plugin session token is deleted on your website.
Error handling
When things don’t go as expected, your callback function is triggered with a null user object and an error code is set in the error field.
{
  user: null,
  error: "..."
}
Below you can see a list of possible error codes you may want to handle.
Error responses
INVALID_CONSUMER
|
The consumer_key value you set in the plugin configuration is not valid for your domain. When this happens, the plugin also shows a warning message in the browser’s console.
|
USER_LOGGED_OUT
|
A call for user information is placed but no user is logged in.
This can happen for example when:
|
Should you encounter a problem using the plugin and if the documentation does not help you solve it, please send an email to social-plugins@xing.com. We will get back to you as soon as possible.
Data privacy
XING places utmost importance to data privacy and security. Accordingly, data privacy comes baked into the Login with XING plugin. Developers don’t need to do anything specific to ensure data privacy when they implement the plugin. The “Login with XING” plugin is the only login-plugin with built-in data privacy!
The library login.js is called by the plugin from a server cluster which hosts and handles the features of the plugin. This server cluster is special in that it has been configured to be as privacy friendly as possible.
Until a webpage visitor clicks the plugin, no information which could be traced back to the user is sent to the XING platform.
When users indicate their will to use the plugin by clicking it, they will activate the button and can then be identified purely to be able to log them in during subsequent visits.
Each third-party website is identified by a consumer key. The user must grant permission to XING to share profile information with that specific consumer.
Supported browsers
- Chrome current version
- Firefox 24 ESR and current version
- Internet Explorer 8 to current version
- Opera current version
- Safari for MacOS/iOS current version